Serve.LoveAll walkthroughsTalk to usBook a demo

Serve.Love · Verified Hours

Set Up and Test Hours Approval

The steps to turn on hours approval and the door check-in iPad, then run one short test event from start to finish: sign someone up, check them in and out at the door, get the review email, approve. Plan on about 15 minutes of your time, plus waiting for the shift to end.

The test, in short

Six steps

1Settings, once 2A test event 3Sign someone up 4Check in at the door 5Review and approve 6See the result

Shown on the demo organization Harvest Table Community Pantry: Dana Whitfield sets it up, Riley Ortiz organizes the test event, and Jordan Rivera is the volunteer. For what each screen means in day-to-day use, see Verified Hours Approval.

Your organizationIn the dashboard
1Settings, once

Turn on hours approval and Door Check-In

Hours approval: Manage > Organization Settings > Verified Hours. Turn on Approve volunteer hours after each event. Under Who approves, keep Each event's organizer. Under When to ask, pick Right after each event ends, Once a day, or Once a week on the day you choose. Leave If nobody reviews on the Friday email to your main contact.

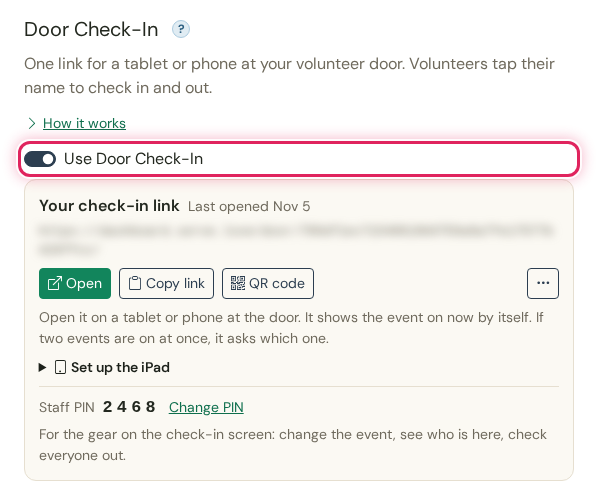
Door Check-In: Manage > Organization Settings > Event Settings. Turn on Use Door Check-In, and your organization's one check-in link and a 4-digit staff PIN show up below it. Press Open on the iPad, or scan the QR code with its camera. The same link works for every event: the iPad picks the one on now by itself.
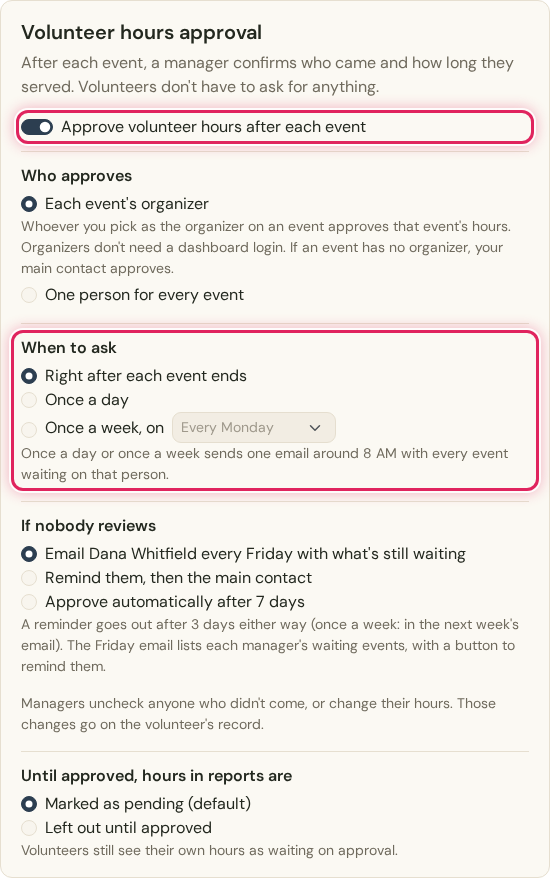
The Volunteer hours approval card, switched on (outlined). Who approves: Each event's organizer. When to ask (outlined): Right after each event ends (picked), Once a day, or Once a week on a day you pick. If nobody reviews: Email Dana Whitfield every Friday with what's still waiting.

When to ask: Right after each event ends, the best choice while you test.
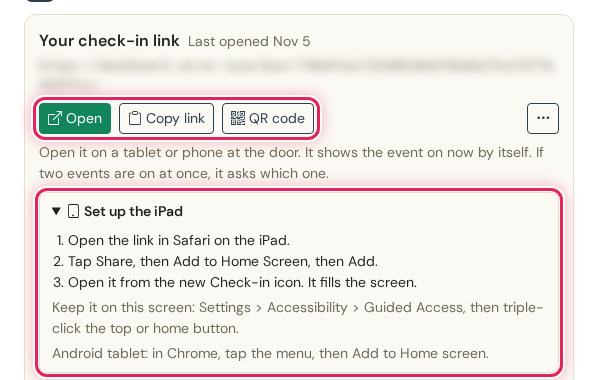
Your check-in link, with Open, Copy link and QR code buttons (outlined), and Set up the iPad opened: open the link in Safari on the iPad, tap Share, then Add to Home Screen, then open it from the new Check-in icon.
The check-in link: Open, Copy link or QR code.
The Door Check-In card in Event Settings: Use Door Check-In switched on (outlined), with the check-in link (hidden here), Set up the iPad, and Staff PIN 2468 with Change PIN.
The card: one link and the staff PIN.
2A test event

Create a short test event

Events > Add New Event. Name it so nobody mistakes it, here TEST hours approval, today, with a 15-minute shift that starts soon. Organizer is required: it is the person who gets the review email. With only one person to choose, the form shows their name.

New events start as Public. After you press Create Event, open the event and set Who can see it to Unlisted, so it only opens from its own link and stays out of every search.
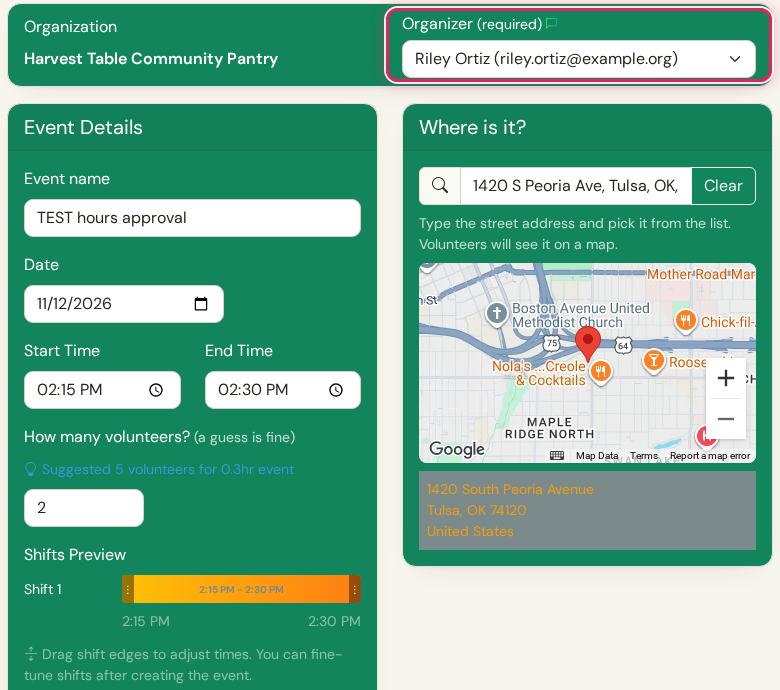
Add New Event: Organization Harvest Table Community Pantry, Organizer (required) set to Riley Ortiz in the dropdown (outlined). Event name TEST hours approval, date 11/12/2026, 2:15 PM to 2:30 PM, 2 volunteers, and a shifts preview with one shift from 2:15 to 2:30 PM.

A 15-minute shift, Riley as organizer.

3Sign someone up

Add a volunteer from the event page

On the event's Volunteers tab, press Assign Volunteer [+], type a name, pick the person, and press Assign to shift. The search lists your organization's volunteers. Adding someone this way doesn't send them a sign-up confirmation.
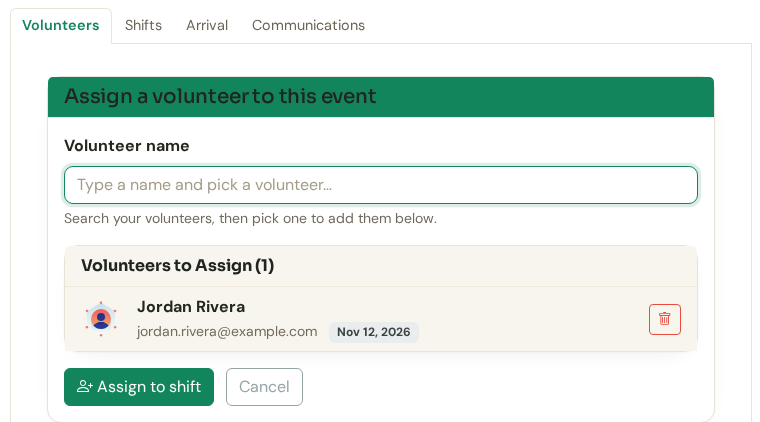
Assign a volunteer to this event: a Volunteer name search box, Volunteers to Assign (1) with Jordan Rivera, and the Assign to shift and Cancel buttons.

Jordan Rivera, ready to assign.

At the doorThe iPad, no login
4Check in, check out

Check in at the door, then check out

The iPad opens the event that is happening now by itself. Check-in opens an hour before the shift starts, unless you changed Check-in opens under Verified Hours > Shifts at the door. The volunteer taps the green Check in button and types their phone number (or taps their name in the list), then taps their name again on the way out. Hours count from the start of the shift, even if they check in early.

To test the forgotten check-out, skip the second tap: anyone still checked in 60 minutes after their shift ends is checked out at the shift's end time. If they have an email address, they get one email asking what time they left, and the review shows their answer.
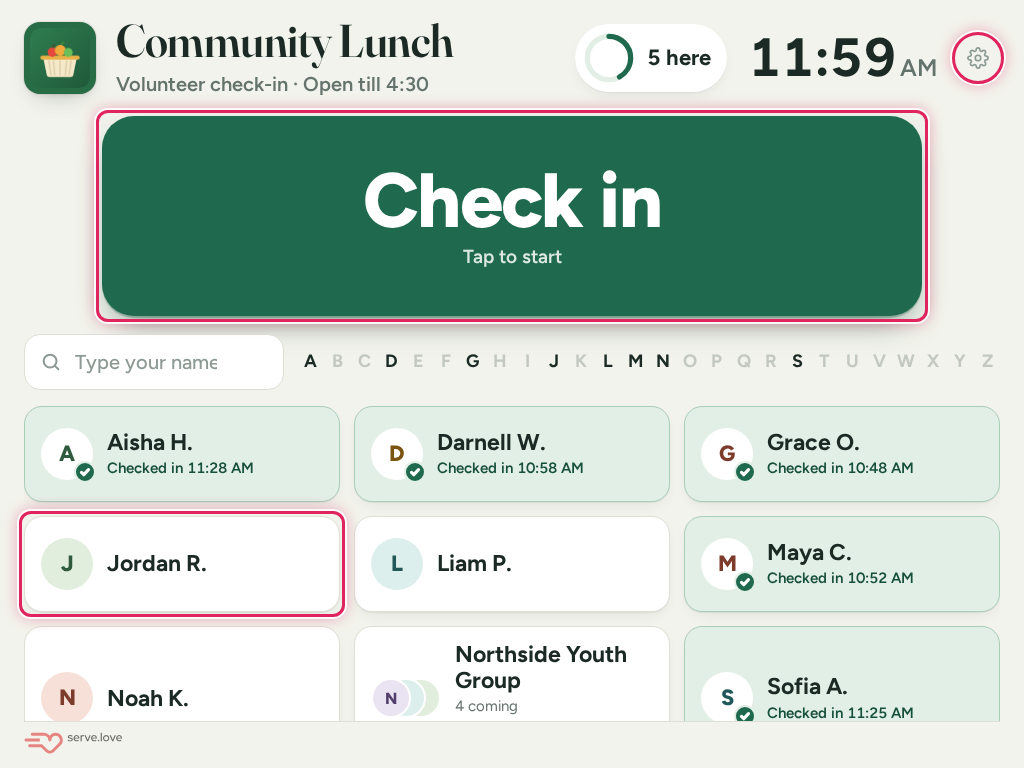
The iPad check-in screen for Community Lunch: a big green Check in button (outlined), the gear (outlined), and name tiles, with Jordan R. outlined.

Check in: the green button, or Jordan's name. Shown on a busier event, Community Lunch.
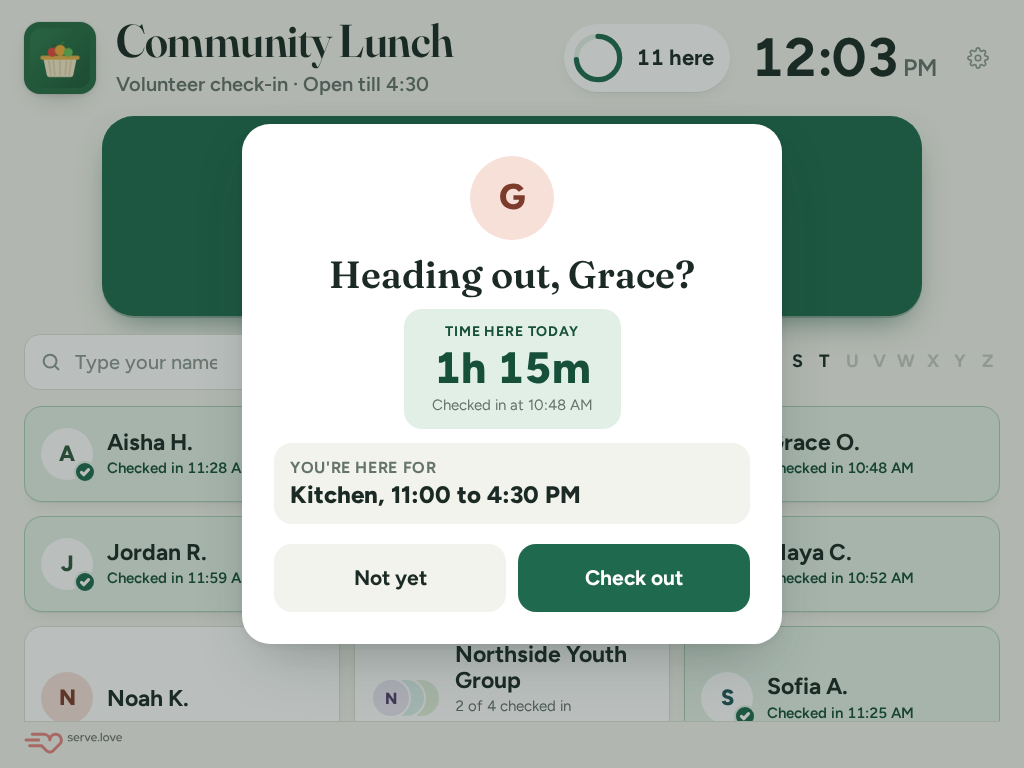
Check out: Heading out, Grace? Time here today 1h 15m, checked in at 10:48 AM, You're here for Kitchen, 11:00 to 4:30 PM, with Not yet and Check out buttons.

Check out after the shift. The iPad counts time since check-in; the review counts from the shift start.

The organizerOne email, then a page, no login
5Review and approve

The review email, then approve

When the email arrives depends on When to ask:

When to askThe review email arrives
Right after each eventUsually within an hour of the shift ending. If someone is still checked in at the door, it waits until they are checked out, up to 3 hours.
Once a dayThe next morning, around 8 AM, in one email with everything waiting on that person.
Once a weekAround 8 AM on the day you picked, in one email.

The email says Times from the door check-in are filled in for you. On the review page, each volunteer's hours come from their door times, rounded to the quarter hour, with the times underneath. Anyone who signed up but never checked in starts unticked. Check the list, type your name if it isn't there, draw your signature the first time, and press Approve and sign.
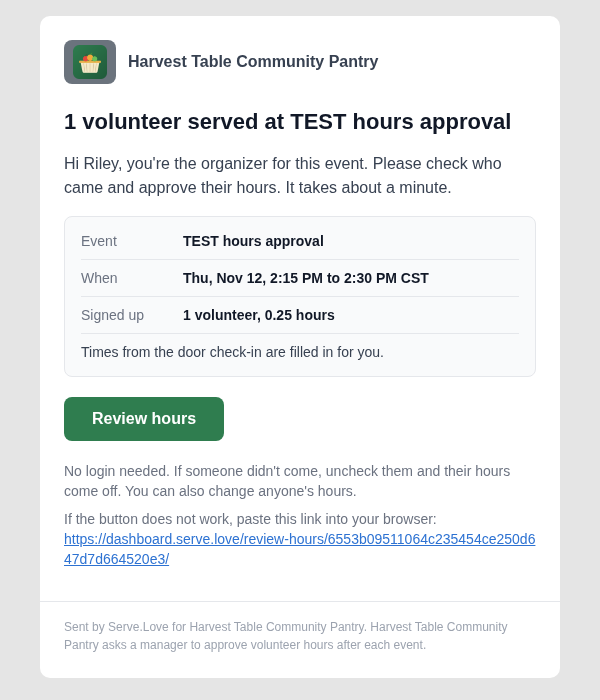
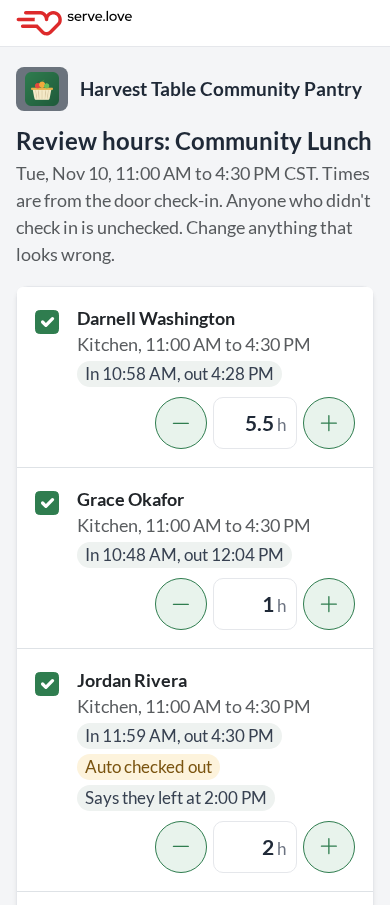
The email to Riley, the organizer.
Review hours: Community Lunch. Times are from the door check-in. Anyone who didn't check in is unchecked. Darnell Washington 5.5 h, Grace Okafor 1 h, Jordan Rivera 2 h with the notes Auto checked out and Says they left at 2:00 PM, each with their door times.
Door times filled in, shown on Community Lunch.
Your organizationBack in the dashboard
6See the result

On the event, and in the report

The event's Volunteers tab says who approved the hours and how many came. Reports > Hours approval lists the event with its organizer, status, hours and who approved it.
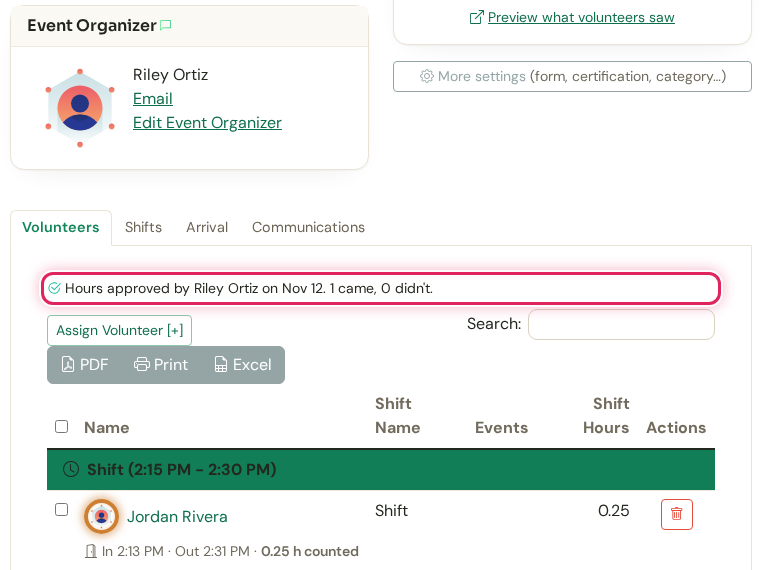
The test event page: Event Organizer Riley Ortiz, and on the Volunteers tab the line Hours approved by Riley Ortiz on Nov 12. 1 came, 0 didn't (outlined), above the roster with Jordan Rivera at 0.25 hours and his door times, In 2:13 PM, Out 2:31 PM, 0.25 h counted.

The event: approved by Riley, 1 came.
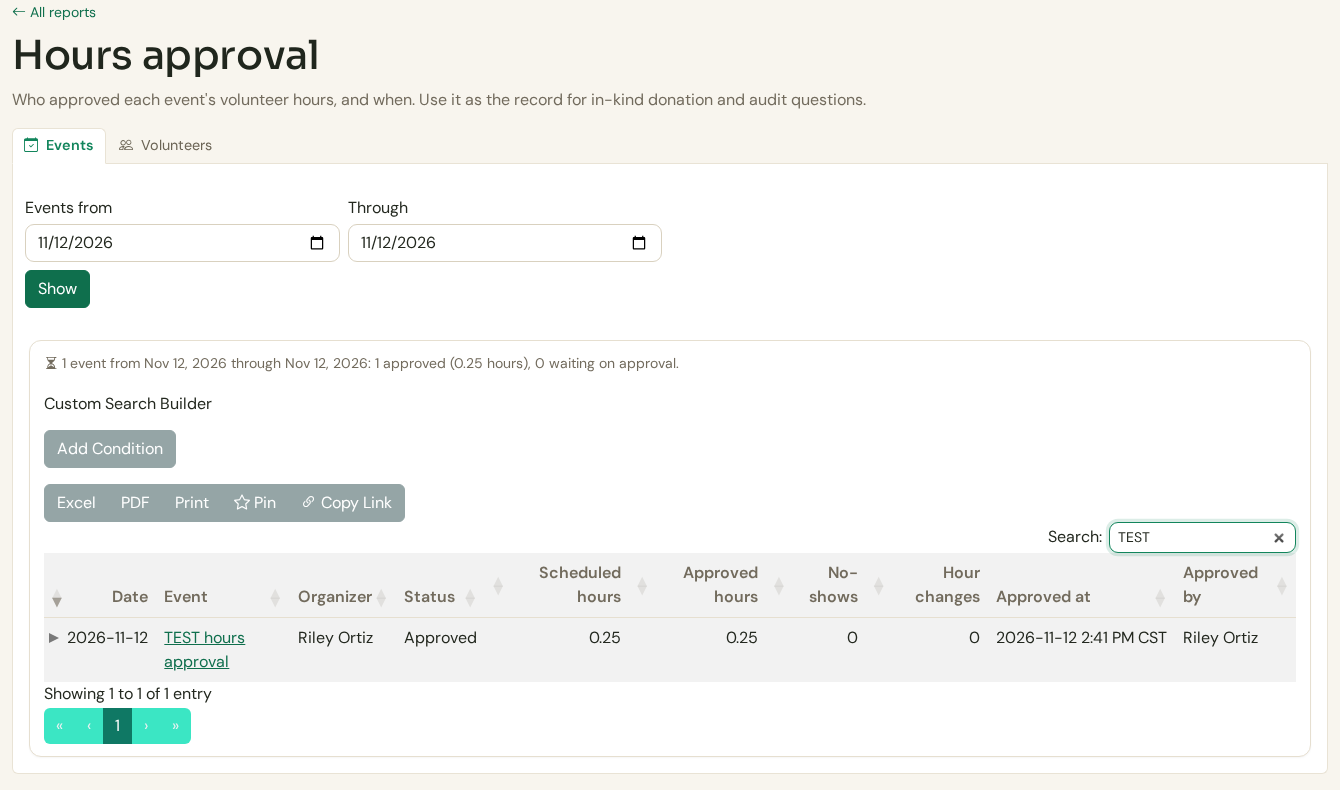
Hours approval report, Events tab, searched for TEST: 1 event, 1 approved (0.25 hours), 0 waiting. TEST hours approval, Nov 12, organizer Riley Ortiz, Approved, 0.25 scheduled, 0.25 approved, 0 no-shows, 0 hour changes, approved by Riley Ortiz.

The report: the test event, approved.

Testing tips

Before and after the test

  • While testing, set When to ask to Right after each event ends. Switch to once a day or once a week when you're done.
  • Use a 15-minute shift that starts soon. Check-in on the iPad opens an hour before it starts, unless you changed Check-in opens.
  • The organizer also gets your usual event emails during the test, such as the new event notice and the "Starting soon" note about an hour before, if you have those turned on.
  • Afterwards, open the test event and press Delete. It doesn't erase the event: it marks it Canceled, and anyone signed up sees it as canceled. You can also set Status to Canceled.
  • Hours totals in your reports count only completed events, so a canceled test event drops out of them. Its row stays in the Hours approval report, where you can see it was a test.
  • Done testing the iPad? Turning off Use Door Check-In stops the link on every device. Lost the link? It is on the Door Check-In card, and under More > Check-in screen on any event.